We will use the free FFmpeg software package to work with videos, FFmpeg supports most types of video and audio formats. In addition, it contains a wide range of filters for video processing. The FFmpeg software package is available for most Linux distributions
for macOS and Windows.
On the cluster, we will run the FFmpeg software package via the command line. To make it easier to set the switches we can use a web interface such as FFmpeg Commander, or a program - on Linux and Windows we can use WinFF.
Format conversion
First we load the appropriate module that will allow us to use the ffmpeg program on the cluster.
Let's now try to use the ffmpeg program to process the video. First, download the video llama.mp41 from the link and save it
to the cluster.
The simplest ffmpeg command converts a clip from one format to another (without additional switches, ffmpeg will select the appropriate encoding settings based on the extensions of the specified files). We need to make sure that the conversion is done
on one of the computing nodes so we use srun.
The -y switch makes ffmpeg overwrite existing files without prompting. Use the -i switch to specify the llama.mp4 input file, and write the llama.avi output file as the last argument, which should be created by the ffmpeg program.
Reducing the resolution
Due to the abundance of options, ffmpeg switch combinations can become quite complex. We find many examples online that we can use as a starting point when writing our commands.
For example, if we want to reduce the resolution of the image, we
can use the filter scale. To reduce the resolution in both directions by half, write:
This command creates a new llama-small.mp4 video from the llama.mp4 input video, in which the height and width of the video are twice as small. The \ character at the end of the first line indicates that the command continues on the next line.
The new arguments in the command are:
-codec:a copy: the audio track should be copied unchanged to the output file and
-filter:v scale=w=iw/2:h=ih/2: use a (video) filter scale, with the width of the output video w equal to half the width of the input video iw (equal to the height).
To use another filter, we can replace the argument scale=w=iw/2:h=ih/2 with the appropriate string, a few examples:
hflip in vflip : mirror the image horizontally or vertically,
edgedetect : detects edges in the image,
crop=480:270:240:135 : cuts out a 480 × 270 image, starts at the point (240, 135),
drawtext=text=%{pts}:x=w/2-tw/2:y=h-2*lh:fontcolor=green : writes a timestamp (pts) to the image.
Filters can be combined simply by separating them with a comma, for example scale=w=iw/2:h=ih/2,edgedetect .
Parallel video processing
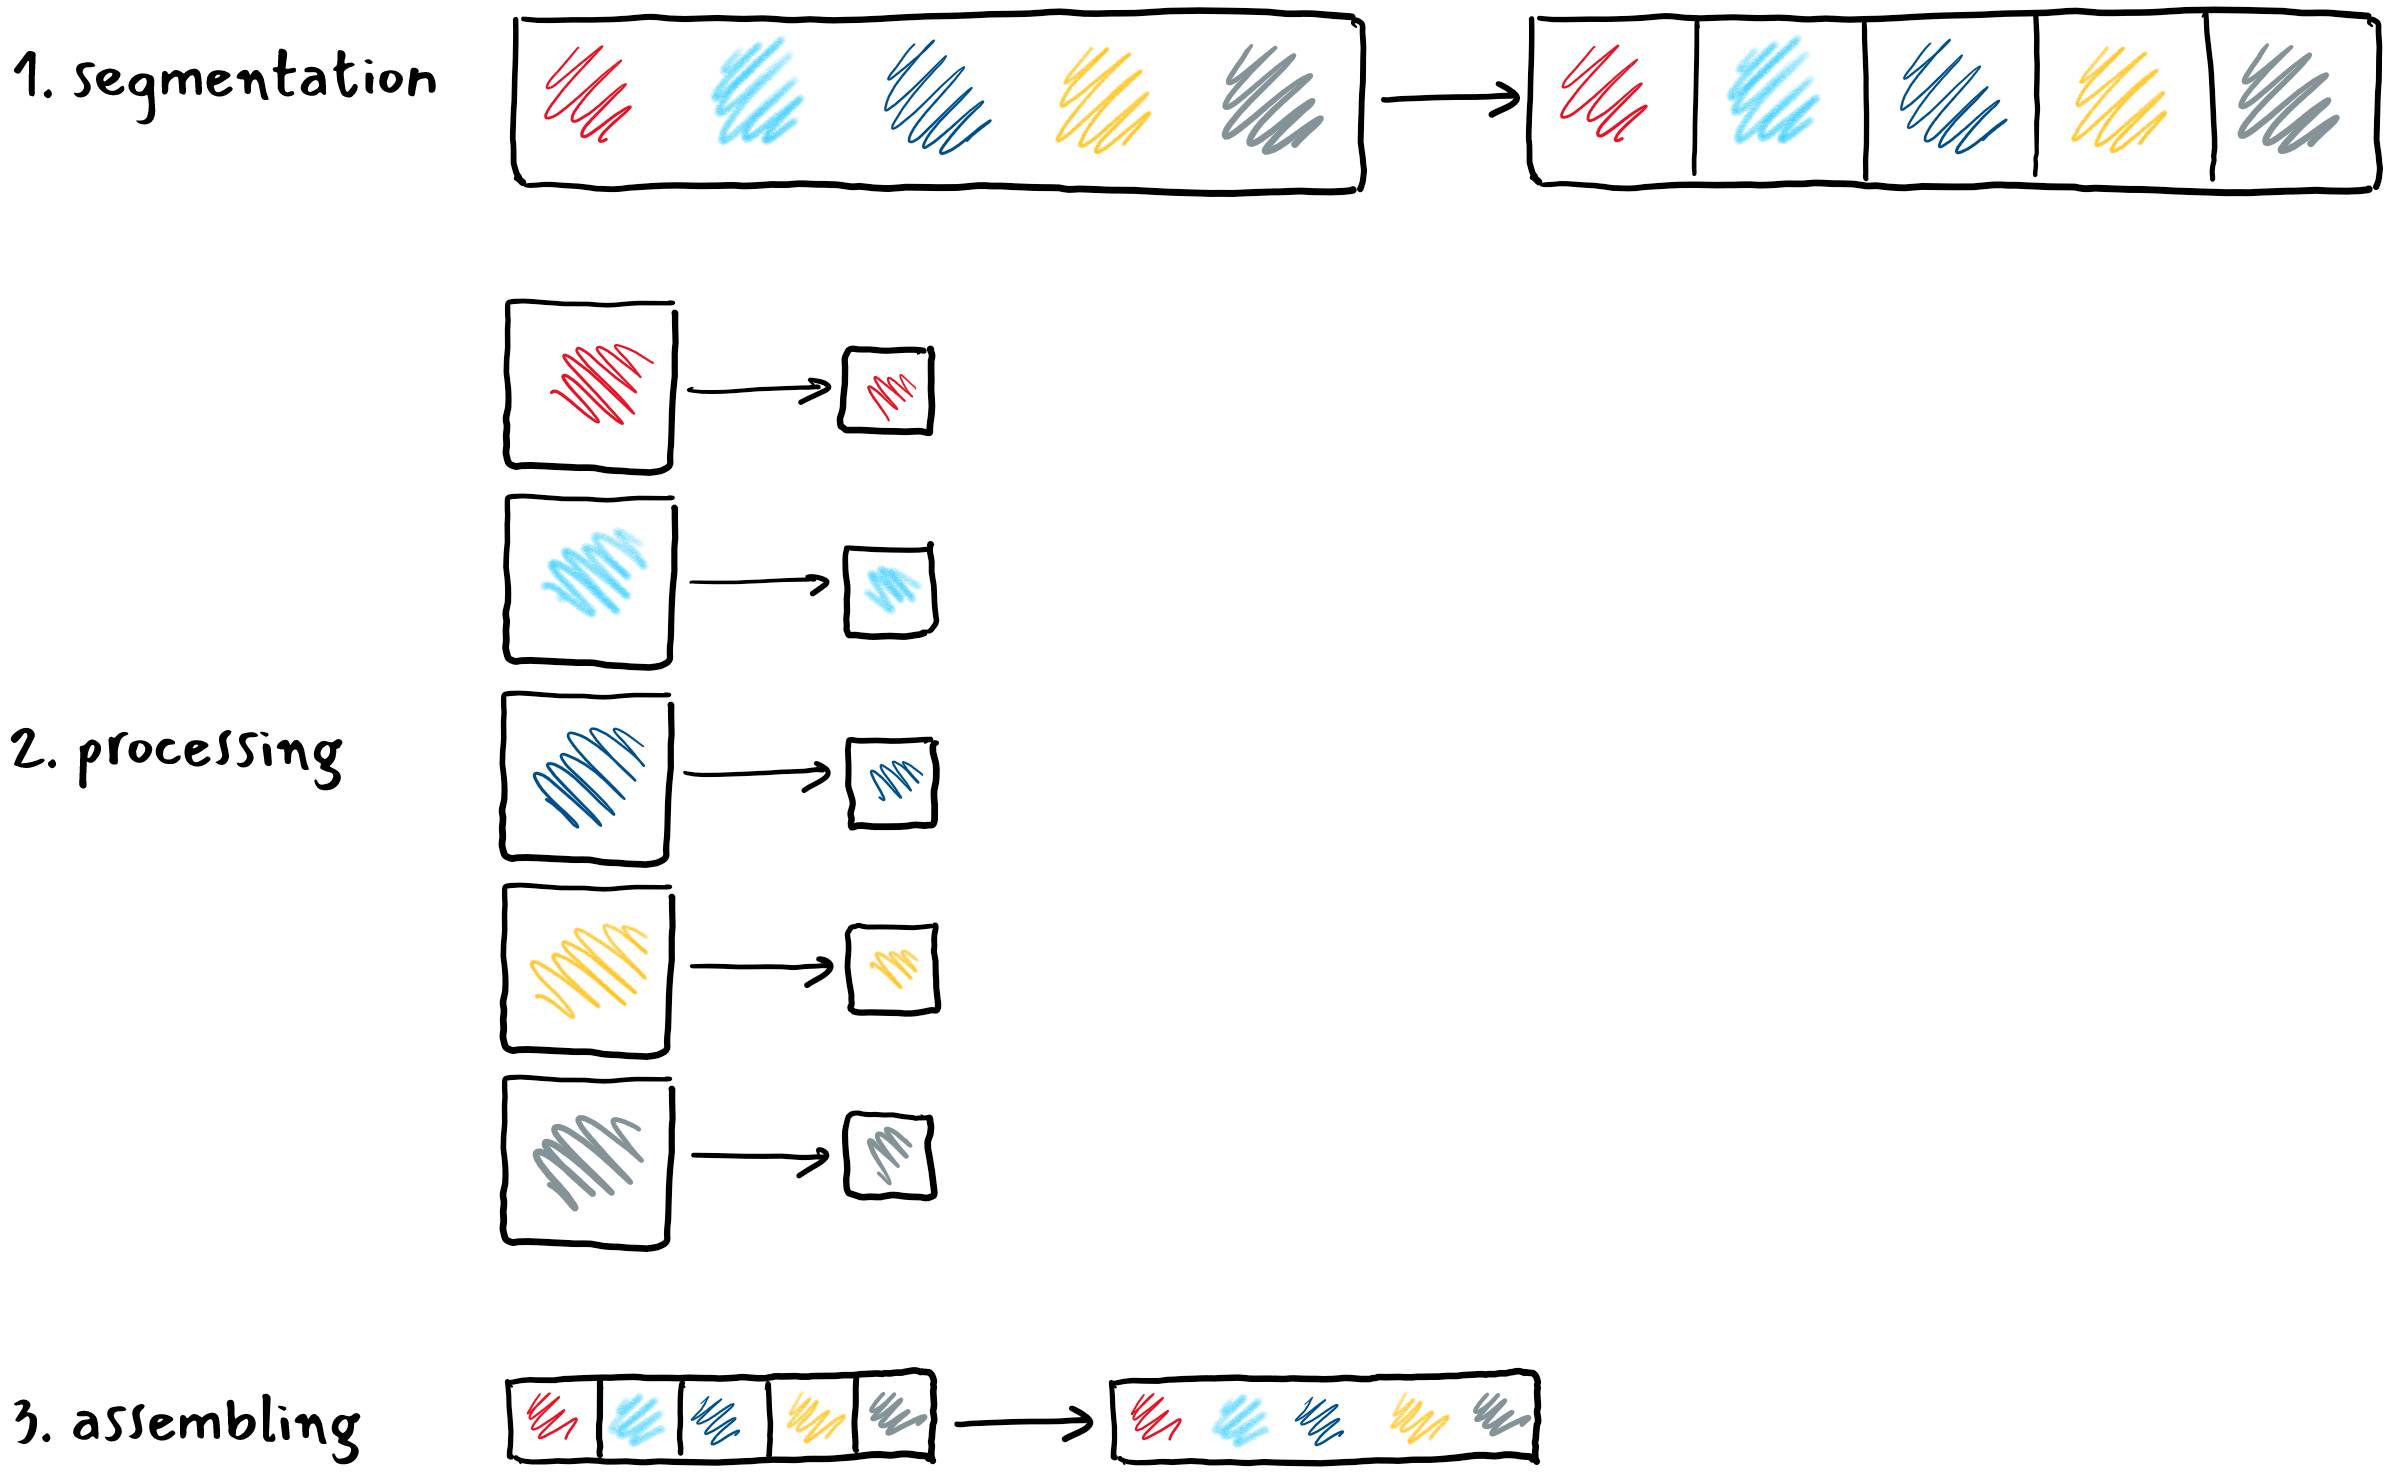
Many problems can be broken down into independent subproblems that can be processed in a parallel manner. A common phrase for this is: embarrassingly parallel problems.
One
such problem is video processing. Here's how to speed up video processing:
first divide the video into a multitude of pieces on one core,
then each piece is processed separately on its core and
at the end the processed pieces are assembled back into a whole.
The advantage of such an approach is that the individual pieces are processed in a parallel manner, each at its own core. If we divided the video into N equal pieces in the first step, the processing time in the second step is approximately equal
to the N part of the time required to process the entire video on one core. Even if we take into account the steps of cutting and assembling at the time of processing, which we do not have when processing on one core, we can still gain a lot in
the end.
We want to break the bbb.mp4 video into smaller pieces, which we will then process in a parallel manner. First we load the appropriate module, if we haven't already.
$ module load FFmpeg
module load FFmpeg
We then divide the video into pieces that are 130 seconds long with the following command:
-codec copy tells the audio and video to be copied unchanged to the output files,
-f segment selects a segmentation option that cuts the input file,
-segment_time 130 specifies the desired duration of each piece in seconds,
-segment_list parts.txt saves the list of created pieces in the parts.txt file,
part-%d.mp4 specifies the name of the output files, where %d is the extension that ffmpeg replaces with the sequence number of the piece during partitioning.
When the process is complete, we have the original video in the working directory, a list of parts.txt pieces, and sequential pieces part-0.mp4 to part-4.mp4:
$ ls
bbb.mp4  part-0.mp4  part-1.mp4  part-2.mp4  part-3.mp4  part-4.mp4  parts.txt
ls
Step 2: Processing
We process each piece in the same way. For example, if you want to reduce the dimensions of a part-0.mp4 piece by half and save the result to an out-part-0.mp4 file, use the command from the previous section:
As always, the srun will require resources and run our task on the assigned computing node. In this way, we could process all the pieces one by one, but with a lot of manual work. So let’s take a look at a simple sbatch script that does this for us.
#!/bin/sh #SBATCH --job-name=ffmpeg1 # job name #SBATCH --output=ffmpeg1.txt # execution log file #SBATCH --time=00:10:00 # time limit for running job hours: minutes: seconds #SBATCH
--reservation=fri # reservation, if any; otherwise we delete the line
Save the script to the file ffmpeg1.sh and run it with the command
$ sbatch ./ffmpeg1.sh
Submitted batch job 389552
sbatch ./ffmpeg1.sh
So far, we haven't sped up the execution, as the script waits for each srun call to finish before running the next one. If we want to send all the pieces for processing at the same time, we add an & character at the end of each srun line, requiring
the command to run in the background. Now the script does not wait for the command to complete, but immediately resumes executing the next command. At the end of the script, we must therefore add the wait command, which waits for all the tasks we
ran in the background to complete. This makes sure that the script is not completed until all the pieces of video have been processed to completion.
Each srun call represents one task in our job. Therefore, in the header of the script, we ask how many tasks to perform at a time. The setting --ntasks=5 means that Slurm will perform a maximum of five tasks at a time, even if there are multiple tasks.
Be careful to add the argument --ntasks=1 to each srun call; without it, Slurm would repeat the task for each piece five times, which is not the most useful.
#!/bin/sh #SBATCH --job-name=ffmpeg2 #SBATCH --output=ffmpeg2.txt #SBATCH --time=00:10:00 #SBATCH --ntasks=5 # the number of tasks in the job that are performed simultaneously
The above method works, but is quite inconvenient. If we change the number of pieces, we need to add or correct lines in the script, which can quickly go wrong. We also see that the individual steps differ from each other only in number in the file
names. Fortunately, Slurm has a solution for just such situations: array jobs. Let's look at how to process the above example:
#!/bin/sh #SBATCH --job-name=ffmpeg3 #SBATCH --time=00:10:00 #SBATCH --output=ffmpeg3-%a.txt # %a je nastavek za oznako naloge #SBATCH --array=0-4
# območje spreminjanja vrednosti
We've added a switch --array=0-4, which tells Slurm to run the commands in the script for each of the numbers 0 through 4. Slurm will run as many tasks as there are numbers in the range specified by the --array switch in our case 5. If we want to limit
the number of tasks performed simultaneously, for example to 3, we write --array=0-4%3.
Each srun command will be executed for one task, so --ntasks=1 can be omitted. We do not specify the actual file name in the command, but use the $SLURM_ARRAY_TASK_ID
extension. For each task, Slurm will replace the attachment with one of the numbers from the range specified by the --array switch. We added the %a extension to the log file name, which Slurm also replaces with a number from the range specified by
the --array switch. This will write each task to its own file. The $SLURM_ARRAY_TASK_ID is essentially an environmental variable that Slurm sets accordingly for each task. When Slurm executes the #SBATCH commands, this variable does not yet exist,
so we must use the %a extension for the switches in Slurm.
After this step, we get out-part-0.mp4 to out-part-4.mp4 files in the working directory with the processed pieces of the original clip.
Step 3: Assembling
All we have to do is combine the out-part-0.mp4 … out-part-4.mp4 files into one clip. To do this, we need to give ffmpeg a list of the pieces we want to merge. We list them in the out-parts.txt file with the following content:
It can be created from the existing list of pieces of the original parts.txt clip. First rename the file to out-parts.txt. Open the out-parts.txt file in a text editor and find and replace all part strings with the file out-part string.
More elegantly,
we can create a list of individual pieces of video with the help of the command line and the program sed (stream editor):
$ sed 's/part/file out-part/g' < parts.txt > out-parts.txt
sed 's/part/file out-part/g' < parts.txt > out-parts.txt
Finally, from the list of pieces in the file out-parts.txt, we compose the output clip out-bbb.mp4.
Finally, we can use the data transfer tool to remove temporary files.
Steps 1, 2, 3 in one go
In previous sections, we speeded up video processing by dividing the task into several pieces, which we performed as multiple parallel tasks. We ran ffmpeg over each piece, each task used one kernel and knew nothing about the remaining pieces. Such
an approach can be taken whenever the problem can be divided into independent pieces. We do not need to change the processing program.
In principle, each business is limited to one processor core. However, using program threads, one job
can use multiple cores. The ffmpeg program can use threads for many operations. The above three steps of peeling can also be performed with a single command. We now run the job with a single task for the whole file, as the ffmpeg program will
divide the processing into several pieces according to the number of cores we assign to it.
So far, we have done all the steps using the FFmpeg module. This time we use the ffmpeg-alpine.sif container. If we haven't already, we transfer the FFmpeg container from the link to the cluster. When using the container before calling ffmpeg, add
singularity exec ffmpeg_alpine.sif. Three programs are now included in the command:
srun sends the business to Slurm and starts the singularity program,
the singularity program starts the ffmpeg-alpine.sif container and
inside the ffmpeg-alpine.sif container it starts the ffmpeg program.
The process we used to do ourselves in three steps is now done by ffmpeg in about the same amount of time. With the --cpus-per-task switch we requested that Slurm reserve 5 processor cores for each task in our business.
While working, ffmpeg displays the status in the last line:
The speed data tells us that encoding is 4.06 times faster than real-time playback. In other words, if the video lasts 10 minutes, we will spend 10.5/4.16≈2.5 minutes encoding.
Use of graphical process units
The graphics processing unit (GPU) is a special processor, basically designed to draw an image on the screen. Among other things, GPUs are optimized for fast computing with vectors and matrices, which is a common operation when working with graphics.
Although GPUs are not suitable for solving general problems, operations that GPUs can perform very quickly prove to be useful in other domains as well, such as machine learning and cryptocurrency mining. Modern GPUs also have built-in support for
working with certain types of videos. Let’s see how we can use GPU to convert a video to another format faster.
Programs such as ffmpeg can use GPUs from different manufacturers through standard interfaces. OpenCL and CUDA are the most commonly
used. The latter is intended only for Nvidia graphics processing units. These are also installed in the NSC cluster.
Preparing the container
The ffmpeg program does not support GPU by default, so we have to compile it with special settings. Here we will use an existing Docker container that already contains the appropriate version of ffmpeg. We convert it to a Singularity container with
the command
The above command displays the settings that turn on support for GPU (CUDA) and related technologies. Technologies supported by a version of ffmpeg can be checked with the -hwaccels argument:
$ singularity exec ffmpeg_4-nvidia.sif ffmpeg -hwaccels
ffmpeg version 4.0.6 Copyright (c) 2000-2020 the FFmpeg developers
…
Hardware acceleration methods:
cuda
cuvid
We will test the method cuda, which, among other things, can encode H.264 records on a graphics processing unit. If we want to use graphical process units in jobs, we must give the appropriate arguments:
First, with the argument --gpus=1, we state that Slurm should request a node with one graphical processing unit. At the assigned node we run the container with singularity exec --nv. The --nv switch allows programs in the container to access the graphics
processing unit. Finally, we require that ffmpeg actually use graphical acceleration to encode the video. Because ffmpeg cannot automatically detect the presence of a graphics processing unit and run the appropriate functions, we specify the requirements
ourselves:
with -hwaccel cuda -hwaccel_output_format cuda we load the appropriate libraries,
with scale_npp we say that instead of the usual scale filter use a filter prepared for graphics processing units (npp - Nvidia performance primitives),
with -codec:v h264_nvenc we select the H.264 coding algorithm prepared for graphics processing units.
Other settings are the same as before. In all previous calls to ffmpeg, we did not specify an encoding algorithm, as the -codec : v h264 setting is the default and can therefore be omitted.
Unlike previous approaches, this acceleration was not achieved by parallel processing at the file level, but we used hardware to encode the video, which can perform the required operations much faster. Here, too, it is really a matter of parallel computing, but at a much lower level, as GPU can perform hundreds or thousands of parallel operations when encoding each individual frame.